Welcome to Our Garage
Daytona Coupe, 289 and 427 Cobras
-39-
Daytona Coupe Cobra -
Weber Tuning
and Initial Test Drives
Now that the Weber engine is installed and some of the other tasks on my list had been completed, it was time to take a few test drives in the car with the new Weber engine.
Initial Engine and Weber Setup
The following summarizes the Weber "system" used for the first road tests.
- Engine: 289 cid Ford with approximately 10.25:1 compression
- Ignition timing:Initial: _____BTDC Total: _____BTDC
- Camshaft: 110 degree lobe separation angle
- Carburetors: Vintage 1965 Italian weber 48 IDA
- Manifold: Non-opposed carburetor mounting manifold (GT350 style)
- Linkage: Rotating center rod with 2 levers connecting with separate heim jointed adjustable link to each of the four Webers. A third lever at the rear is actuated from the accelerator pedal cable.
- Fuel: Fuel pressure regulator set at 2.5 PSI. One AN fuel hose from regulator feeding all four Webers in series.
- Air box: Not installed at this time (to facilitate linkage adjustment)
The following internal components and adjustments were used on the Weber carburetors:
- Idle jet: 65
- Idle holder: 100
- Main jet:155
- Main air corrector: 200
- Emulsion tube: F11
- Idle mixture screws seting: approximately 3/4 to 1 turn out
- Float setting: Carb body to float: 5.5 - 6.0 (inverted float drop adjustment)
- Float inlet valve: Carb body to tIp of inlet ball: 25mm
Initial test drives
Although the engine had been initially run on a test stand, these runs were more of a "it starts, it runs and it doesn't leak" test. The real test was when I got the car onto the street under it's own power.
I really didn't know what to expect so I forged ahead with a few trips around the block simply to make sure that everything worked and there were no leaks. Meeting with no significant issues, it was time to venture a little further from home and start getting the feel of the car with the new engine.
The initial drives were sort of OK. The most impressive thing was the noticable improvement in response over a four barrel carb. However, I also knew I was in store for some Weber tunning. The biggest problem was some significant exhaust poping (apparently a somewhat common problem with Weber engined cars which haven't been properly tuned). I won't bore you with the details, but after a lot of checking, adjusting, synchronizing, etc. etc. I finally identified two issues that needed to be rectified:
First, float adjustments on all four carburators deviated significantly from Weber factory specification. I disassembled the carbs and set the floats to factory specifications. This was not a difficult tasks, simply a part of the Weber learning experience. To make the task easier requires the use of three small tools (which can be made or purchased). A little gentle bending of a small tab on the float and all was fixed.
The second and more significant issue was noted when synchronizing the four carburetors.The objective of carb syncronizing is to make adjustments to provide the same air flow to each engine cylinder. A tuning device (commonly reffered to as a snail gauge because of it's physical shape - see photo below) is used to simplify this process. Each Weber has two separate butterflys on a common shaft with each butterfly feeding a separte engine cylinder. When initially built and adjusted at the factory, each of the two carburetor butteflys are synchronized to flow the same volume and should therefore also read virtually identical on the snail gauge. The short story is after reinstalling the "new - fuel level correct" carburetors and going through the linkage setup and syc procedure (again), I realized all of the carbs had significantly different flow readings between butterflys within the same carb. The two obvious possibilies were; either the butterfly shaft was slightly twisted or the butterflys were not correctly centered within their respective carburetor bore.
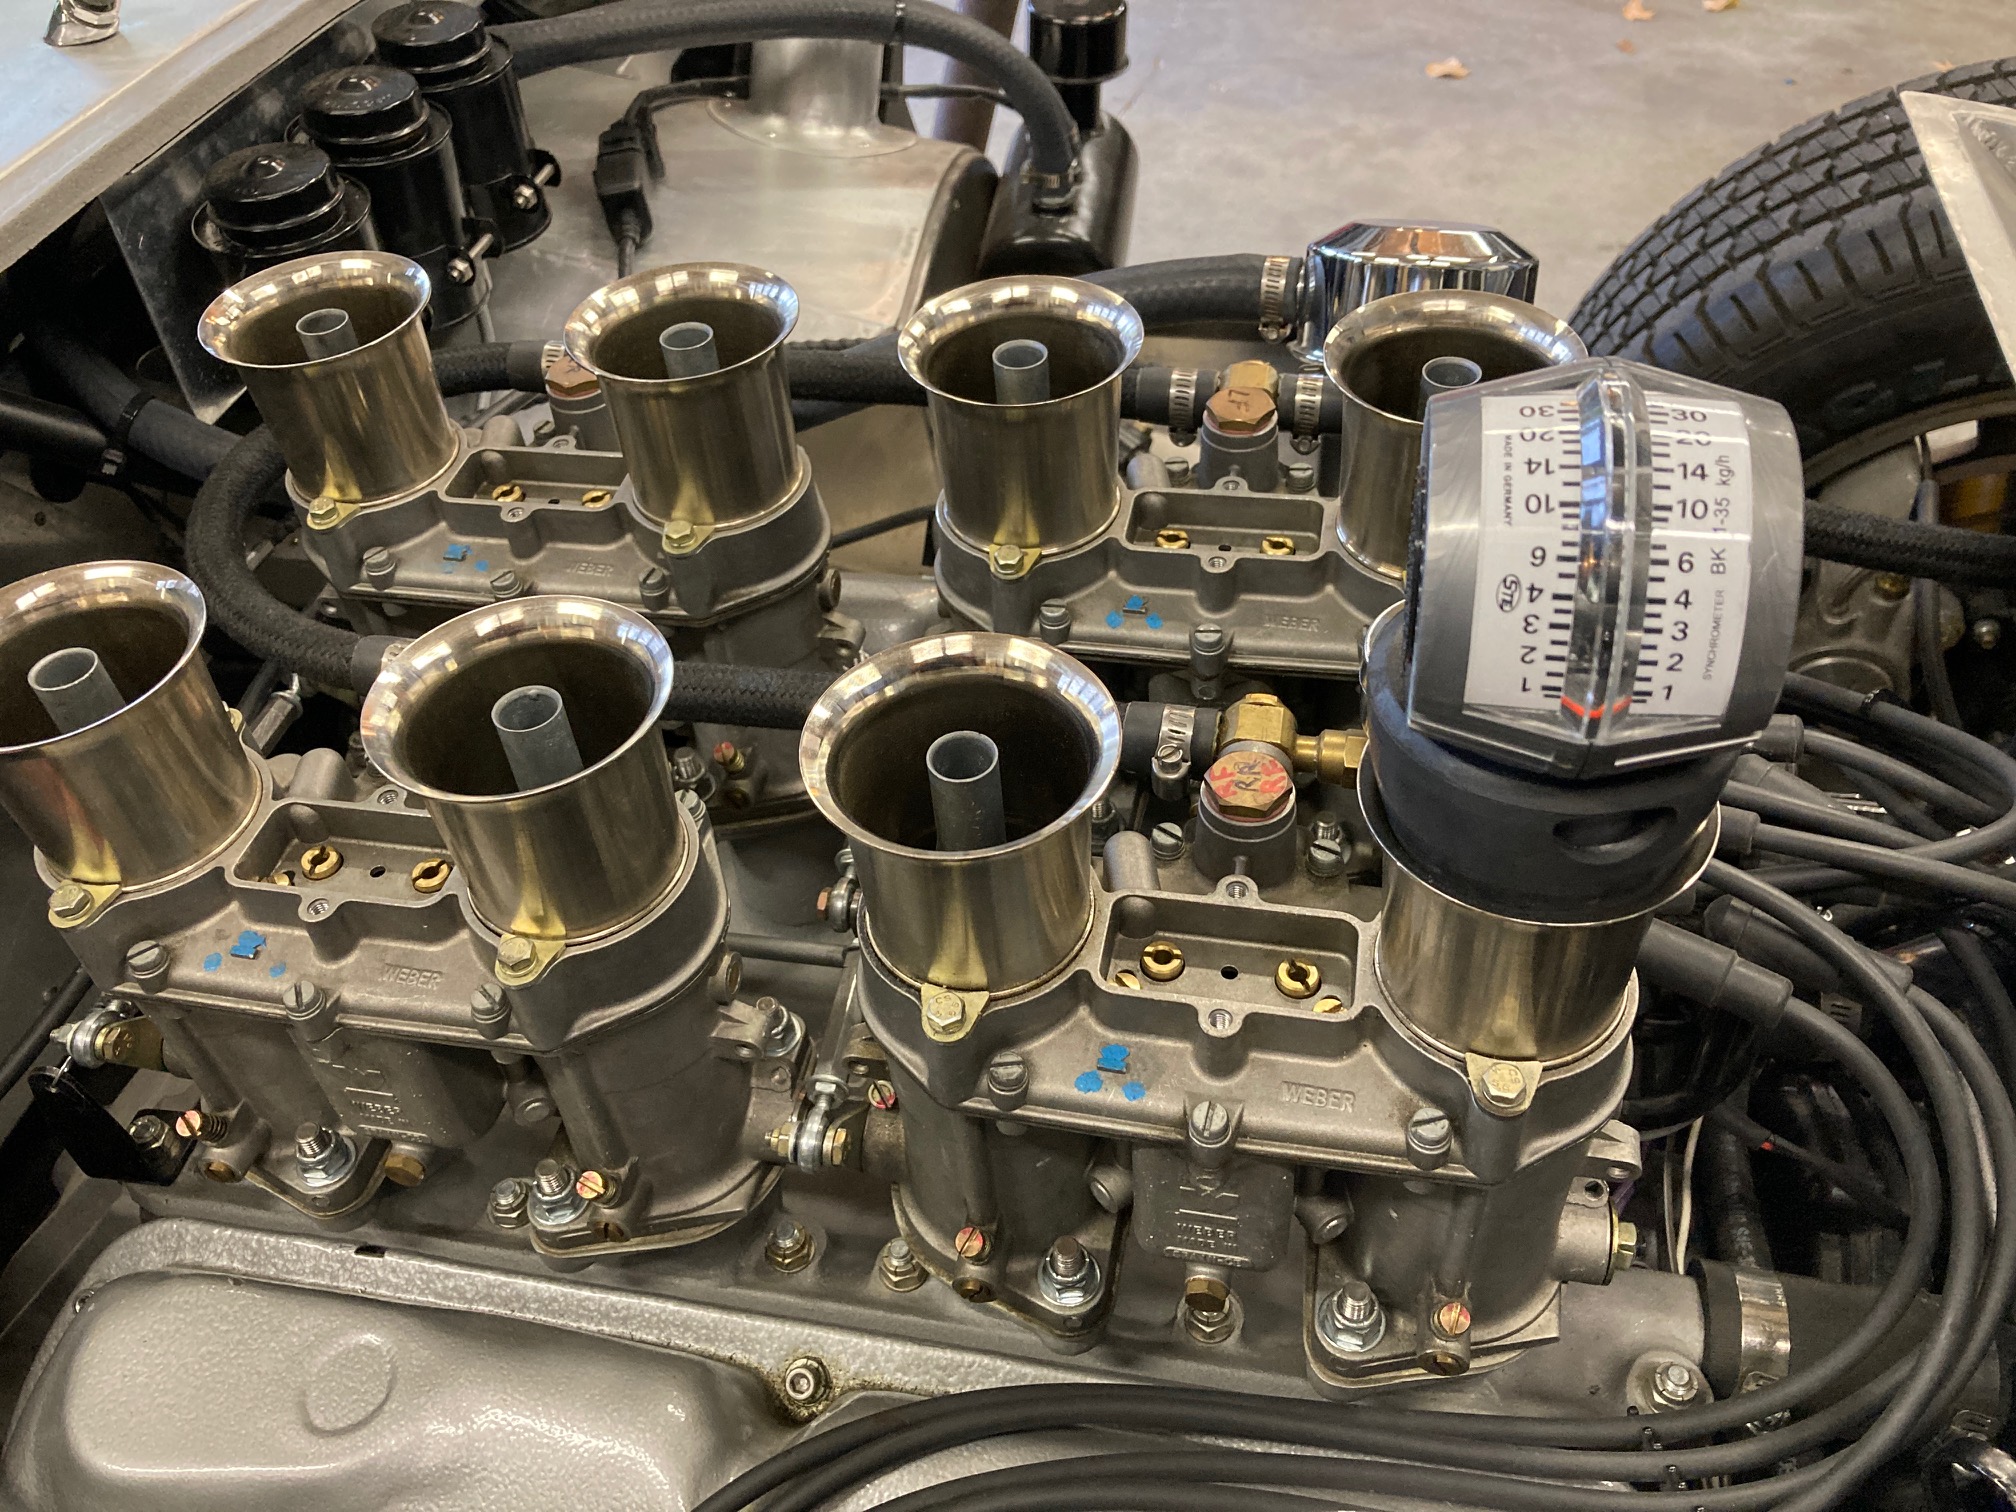
Hmmmmm. Time for a glass of Italian wine and properly consider the Weber situation.
I finally decided to postpone resolution of the butterfly issue by simply sidesteping the problem (at least for now).
Plan "B"
Every problem has a solution. My Plan B temporary solution presented itself when another Cobra buddy decided to sell an essentially new set of 48 IDA Weber carbs. These were the currently sold 48 IDA Webers manufactured in Spain. These replacement Webers do not have the 1965 pedigree of my original Webers, but this is planned to be an interium fix only and eventually the 1965 vintage Webers will be repaired and find their way back onto the Daytona. The good news is it gives me a way to proceed without spending time resolving the butterfly issue on the original Italian Webers.
Since these new Spanish Webers reportedly never ran correctly on the previous owners Cobra, I anticipated the need to do some parts evaluation and probably replacement. The engine they were on was also considerably different (i.e. larger displacement) than my 289, so checking the jets and emulsion tubes was the first order of business. As expected, the jets and air correctors were larger than those recommended as a starting point for my engine. Additionally, the emulsion tubes were also different than what I wanted as a beginning point. The parts were changed to the components used in the Italian carburetors as listed above.
Being sensitive to the float level issue with my original Webers, I also checked and reset the level. They were off more than my original set of Webers even though they had less than a few hundred miles on them. By now I was becoming much better at checking and readjusting Weber float levels to the correct factory specificaions.
Cutting to the chase, after installing the Spanish 48 IDAs and again going through a linkage syncronizing, idle speed setting and idle mixture adjustment, there was an immediate and dramatic improvement in engine behavior.
Lesson learned; check the float levels yourself.
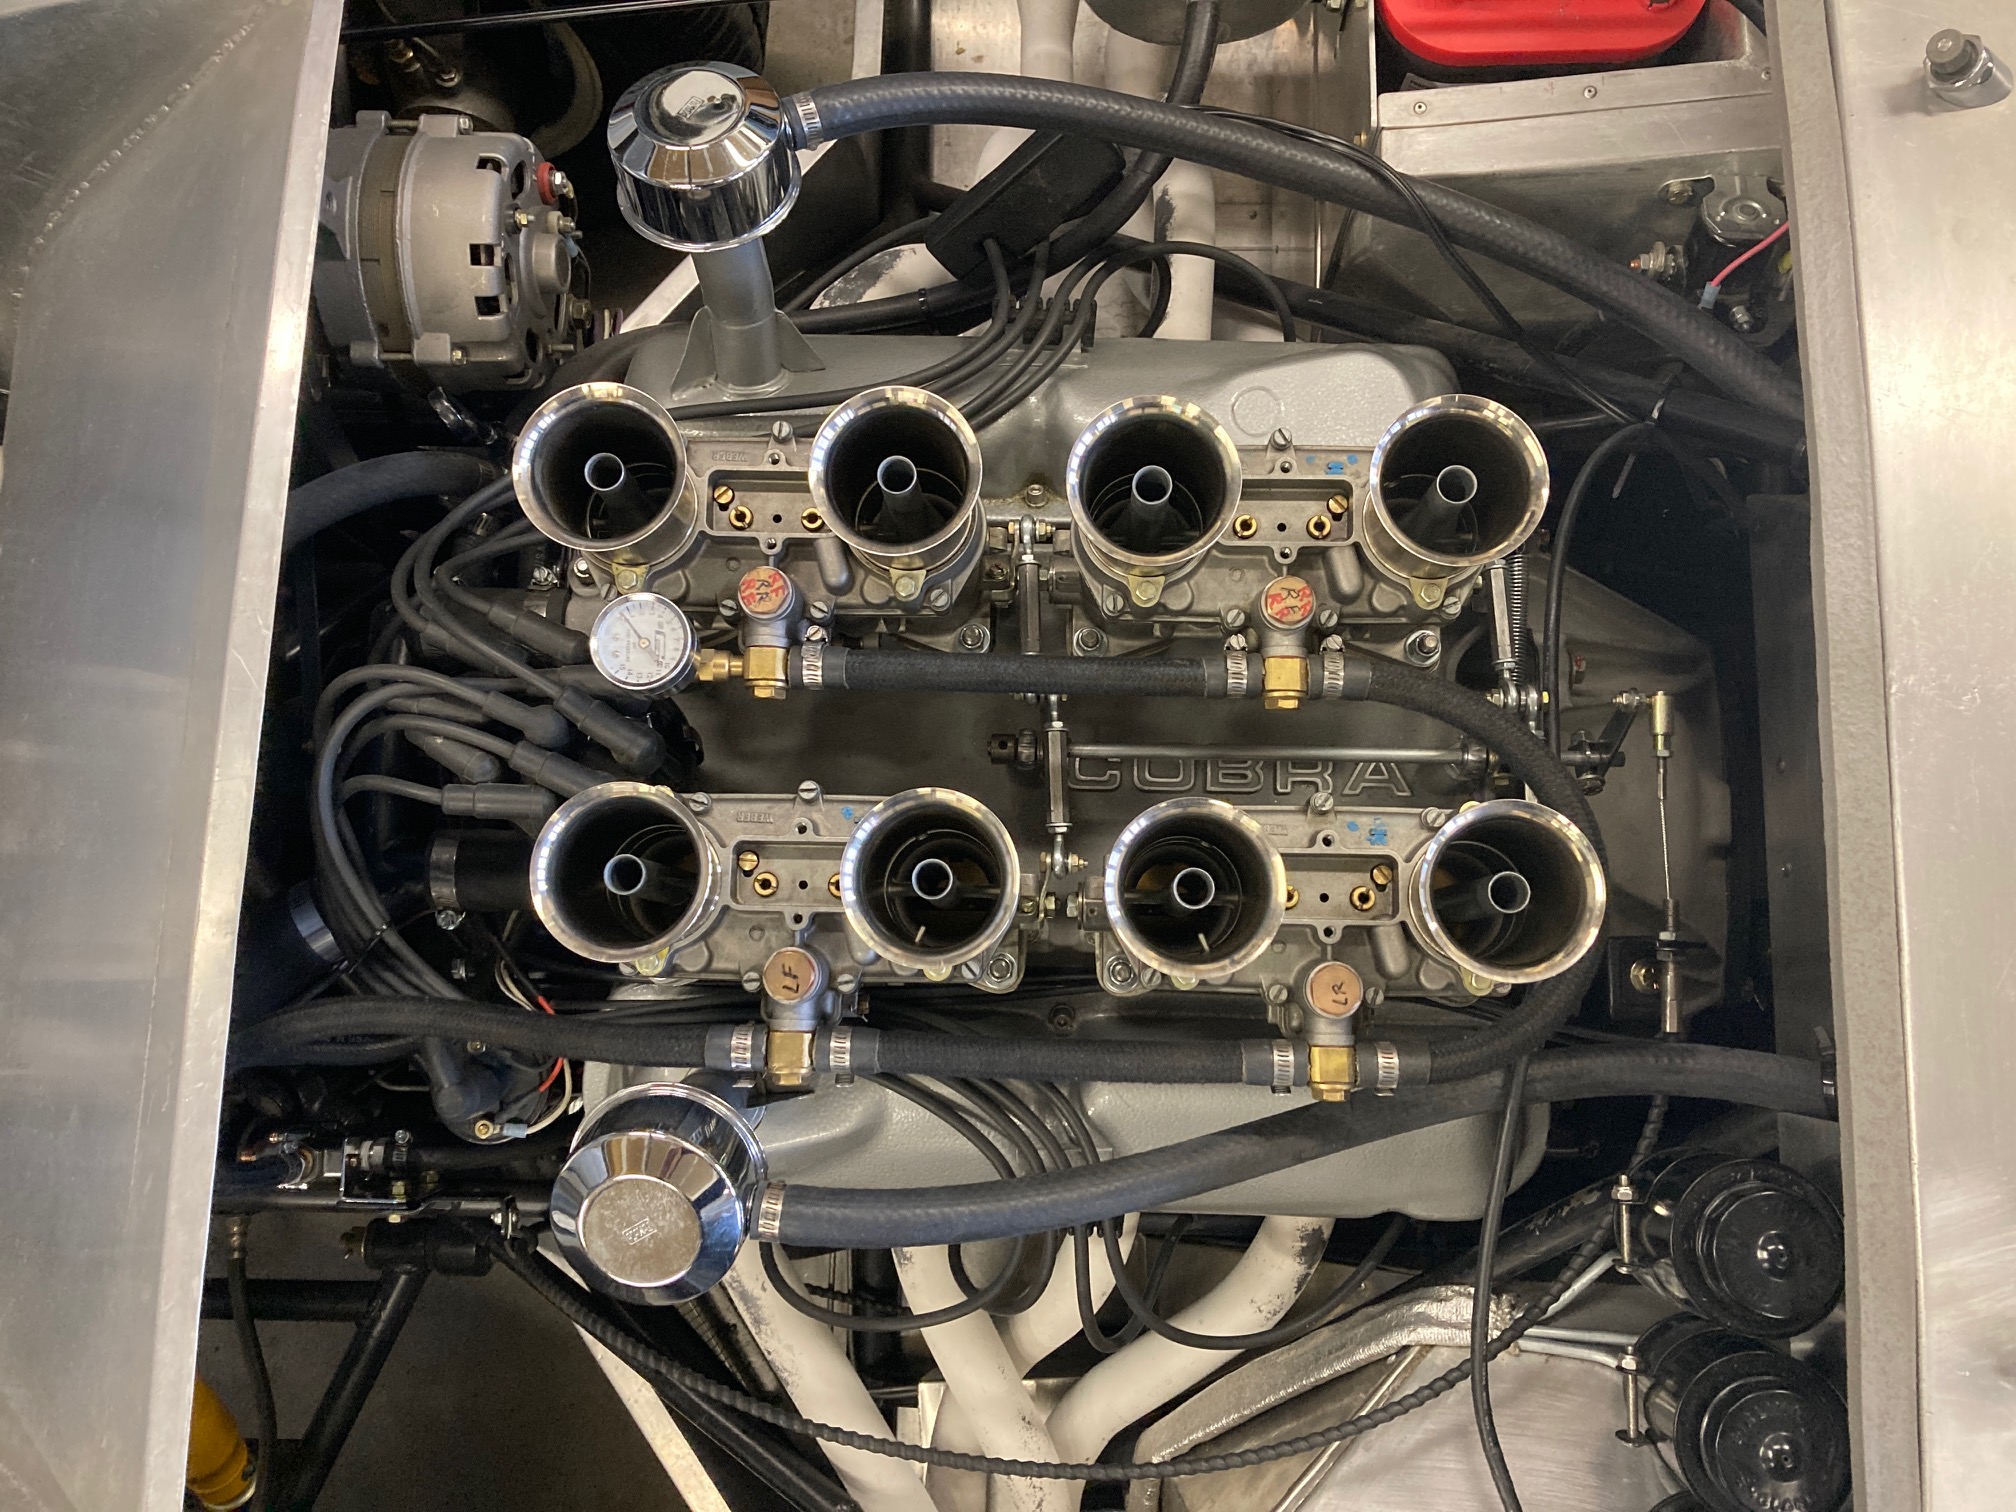
The following photos show the installation in it's present condition. The only change to the bullet point summary list above was the replacement of the Italian Webers with the Spanish Webers. All internal jetting and other components were installed in the Spanish Webers.
Next steps
I'm not finished tuning, but the present setup allows me to begin making refinements to the overall tune of the engine. More imortantly is that it allows me to beging enjoying the car again.

One obvious ommission from the engine may be noted in these photos; the Daytona's trademark Weber cold air box is missing. Installation of the air box during the initial engine tuning made access to the linkage and mixture adjustment screws more difficlut, therefore the box was simply left off for now. The air box has been fabricated for quite some time and is patiently hanging on the shop wall. A few minor adjustments of the box will probably be required to finalize the fit of the linkage and fuel hoses. As tuning winds down, and as time permits, the air box will be reinstalled.
As noted on a previous page, bungs (threaded plugs) were installed on the four header collectors to allow (temporary) installation of a wide band oxygen sensor probe for monitoring the air fuel ratio (AFR). The plan is to record the AFR while driving and use the data as a guide to future tuning.
A little further in the future I will tackle resolving the butterfly shaft problem on the original Italian webers and get them reinstalled on the car.