Welcome to Our Garage
Daytona Coupe, 289 and 427 Cobras
-02-
Cobra Fabrication -
Tools and Equipment -
CNC
Milling Machine
Introduction
First and foremost, I regard myself as a hobbyist. I am not a professional machinest nor an expert in CNC related equipment or software. I simply like to tinker with cars and stuff related to cars.
CNC (Computer Numerical Control) technology has been around for several decades in the manufacturing industries specializing in large, complex and / or mass producted components. More recently, the cost of CNC technology has dramaticly decreased to a point where it is now much more readily available to smaller companies and hobbiests.
Recently, I have made an addition to my arsenial of tools and equipment used for fabicating parts for my Cobra projects. The short story is that a medium size CNC milling machine is now living in my shop.

The Journey Begins
The slightly longer story of my interest in CNC technology and the journey that I hope will lead to continuing the Cobra fun goes something like this. There were four separate but significant events that sparked this new interest in "CNCing".
The initial event was attending an open house at the Tormach Inc home office located in Wisconsin. I had only anticipated spending a hour at the event, but ended spending the entire day. During the event, Tormach staff demonstrated their product line and gave detailed technical seminars covering many aspects of the CNC process. For those interested, the following is a link to their web site: Tormach Inc. web site
Secondly, and about the same time as the Tormach visit, I became aware of a very powerful 3D CAD software package; Fusion 360 manufactured by Autodesk, Inc. Although I had played with other 3D CAD software packges, I had never pursued them in detail for a variety of reasons (steep learning cuvre, cost, applicability to my projects and a host of reasons). In my mind, Fusion 360 is a game changer for small professional shops and hobbyists alike. In simple terms, Fusion 360 integrates into one single package, the ability to draw (model) components in 3D and then provides the capability to generate the computer instruction codes necessary to drive a milling machine. Again, for those interested, the following is a link to their web site: AutoDesk Fusion 360 web site
Third was for the last few years, one of the most well known and exacting manufactures of Cobras started using the CNC process in the production of their cars. Kirkham MotorSports located in Provo Utah has been very succussful in making an increasing number of Cobra parts with their CNC equipment. Admittedly their machines and software are much more sophisticated than a hobbyist could afford; howevver, the concept was there.
Finally, it became evident that the availabiity of some of the original style Cobra parts was becoming more and more difficult to obtain. The average "working guy" enthusiast wanting to build an authentic Cobra themselves was being more and more squeazed out of the hobby. There are no doubt many that are more inclinded to spend their resources on equipment and tools rather than simply ordering all of the parts from a vendor.
The timely intersection of these factors led me to the concept of attempting to machine some of the orignal Cobra parts at home for my own projects.
My goal for this section of the site is to provide a "proof of concept" by using a personal size, home CNC milling machine to fabricate parts for my cars. I hope this section provides some insight into my journey down this part of the Cobra hobby and inspire others (whether for a Cobra or other related hobby) to be able to do likewise.
CNC machine
The idea of a CNC machine for the home shop can take many avenues; from a DIY approach of converting a manual milling machine to purchasing a complete machine and everything in between. Not trying to oversimplify the two approaches, the following were a few of the major considerations for me.
Manual machine conversions: There are many YouTube postings by individuals that have very successfully converted manual milling machines into very capable CNC machines. There are a number of hobbyists that offer detailed documentation on how they built their machine. The downside is that it can be a lengthy, technically challenging process. Also, if there is a technical problem, you are going to have to resolve it yourself (or perhaps with the assistance of other hobbyists).
Purpose build CNC machine: A number of manufacturers have CNC equipment that targets the hobbyist and small or prototype shop market. Some manufacturers are more supportive of their products and strive to keep improving and advancing the product line. Purchasing a complete machine from a manufaturer that is fully operational, tested and supported machine offers several advantages. This approch does offer instant gratification; however, it typically comes with a price.
I was fortunate enough to find a used CNC milling machine which was only a few years old and was manufactured and supported by one of the major US players in the business. The machine I aquired was the middle of the Tormach line (PCNC-770 Series 3) in size and had been very lightly used in a home shop environment. Other than a general overal cleanup and upgrading of the machines software, it was good to go from the day I brought it home.
The following photo is the machine after cleaning and moving it into the shop.

Learning the CNC machine
Learning the CNC technology was a new thing for me. I recall thinking, "how hard could it be"?
Conceptually the process is pretty simple and in summary consists of the following basic steps:
- Draw a part in CAD (Computer Aided Design) software.
- Use CAM (Computer Aided Manufacturing) software to select appropriate cutting tool(s) and develop the paths which the cutters should follow in maching the part.
- Use the CAM software to simulate the finalized cutting paths on the computer before going to the actual milling machine. (Sort of like the "measure twice and cut once" philosophy.)
- Use the CAM software to "automatically" create the computer code (called "G-code") for machining the part.
- Transfer the G-code to the milling machine computer.
- Load and secure the raw material into the machine.
- Insert the appropriate cutting tool(s) into the machine.
- And finally, press the "go button" (referred to as the "cycle start button") to begin the machining process.
If everything goes correctly (and depending on the part complexity), anywhere from a few minutes to a hour or so later, you will have your newly machined part.
The proof of concept part of my idea required that I use the parts developed in my 289 Cobra -Cast Parts drawings (shown on the linked page of this web site) as the basis for my CNC learning experience. Click here for a link to the 289 Cobra Accelerator Mount - 3D model
The drawing referenced is one of the two parts that I selected and was developed with the Fusion 360 to make a 3D model and then (still within the Fusion 360 program) developed the tool paths and G-code used.
First Parts
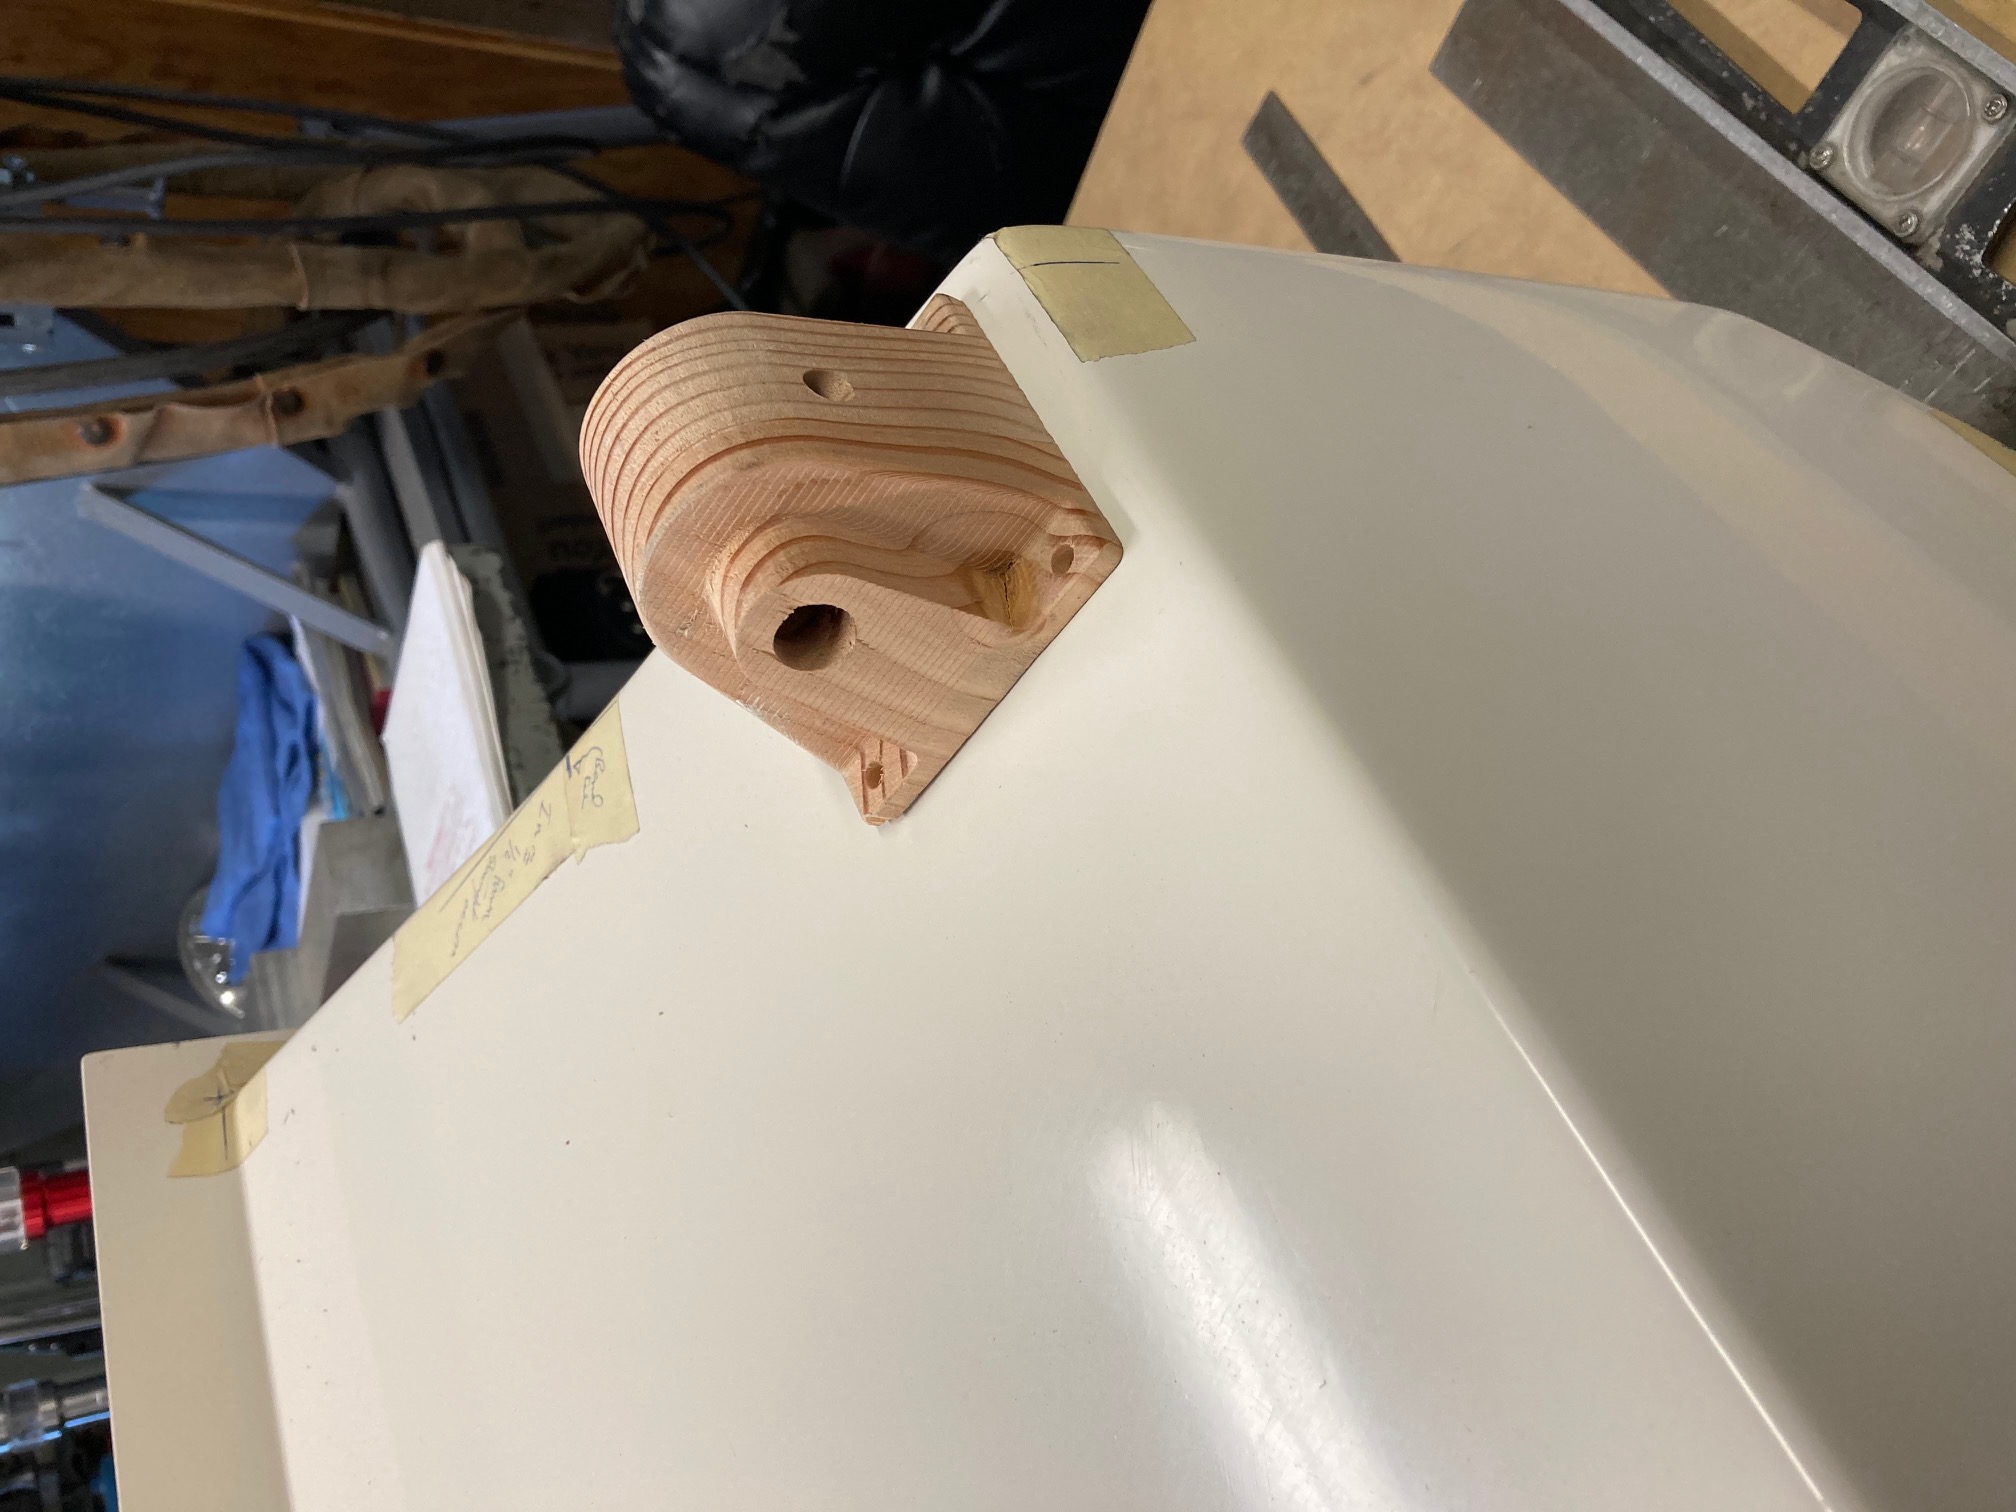
I decided to take it slow at first and started with a few parts cut from wood rather than steel or aluminum.
The following photos show the first acutal wood part made on the machine; an accelerator pedal mount for a 289 Cobra roadster. The "wood" test was exciting to see. The next step will be to get some 6061 aluminum billet to machine a "real" part.

The next test part was also machined out of wood. This part is a 289 Cobra and Daytona Coupe rear suspension upright bearing retainer. It was chosen because I wanted to see how the machine handled steel.
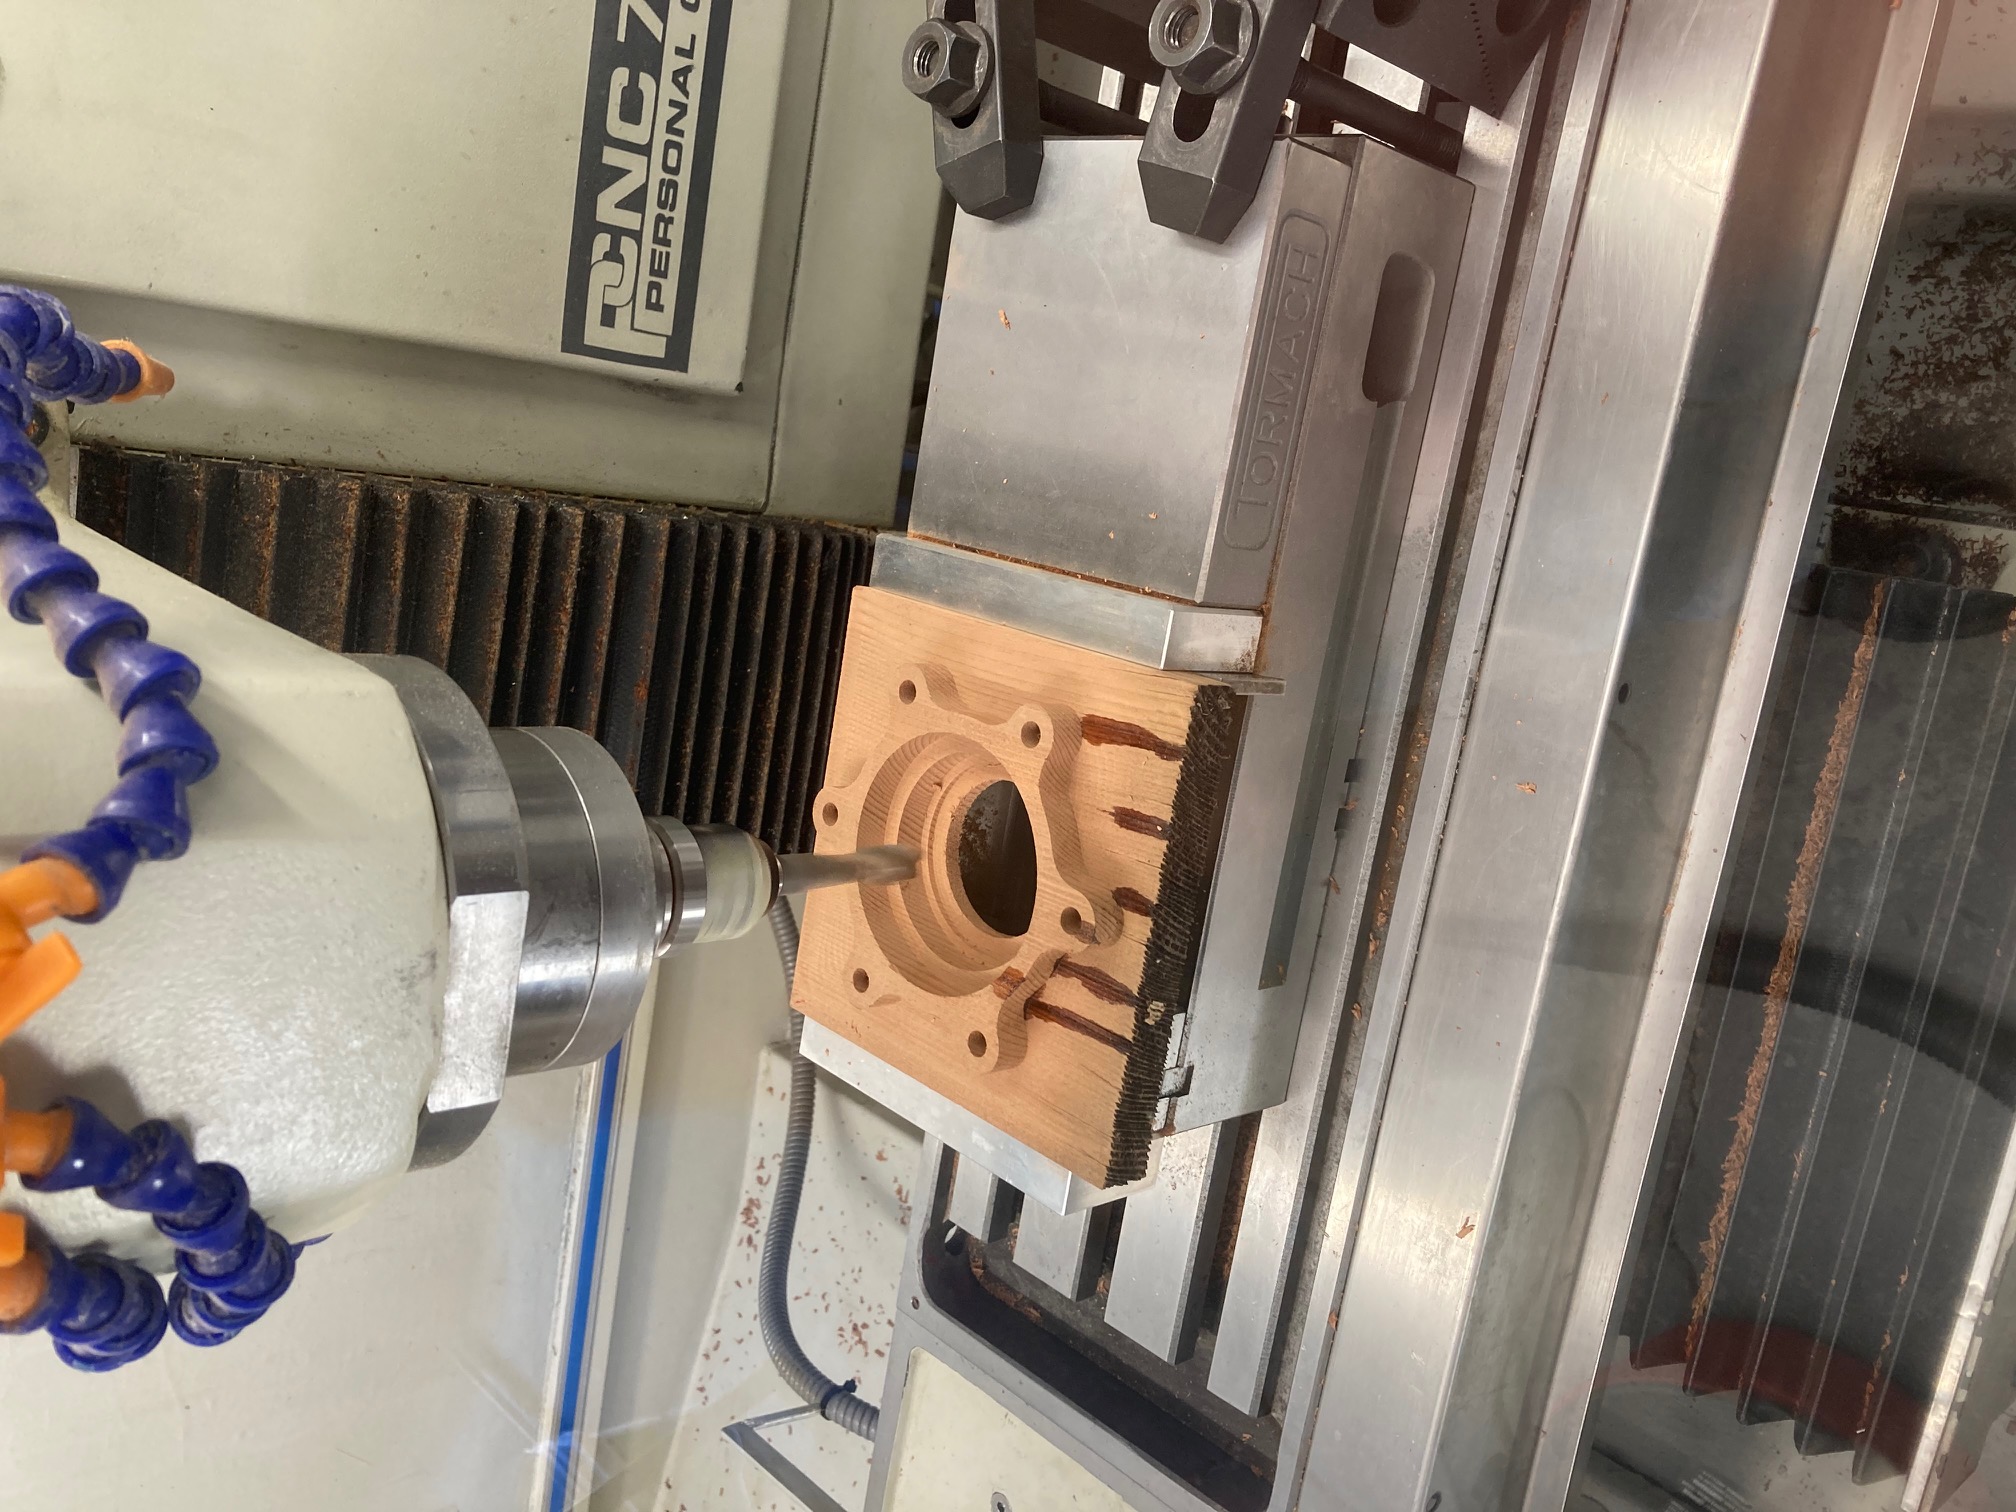
The wood part looks good. Next test is moving on to machining the part from steel.
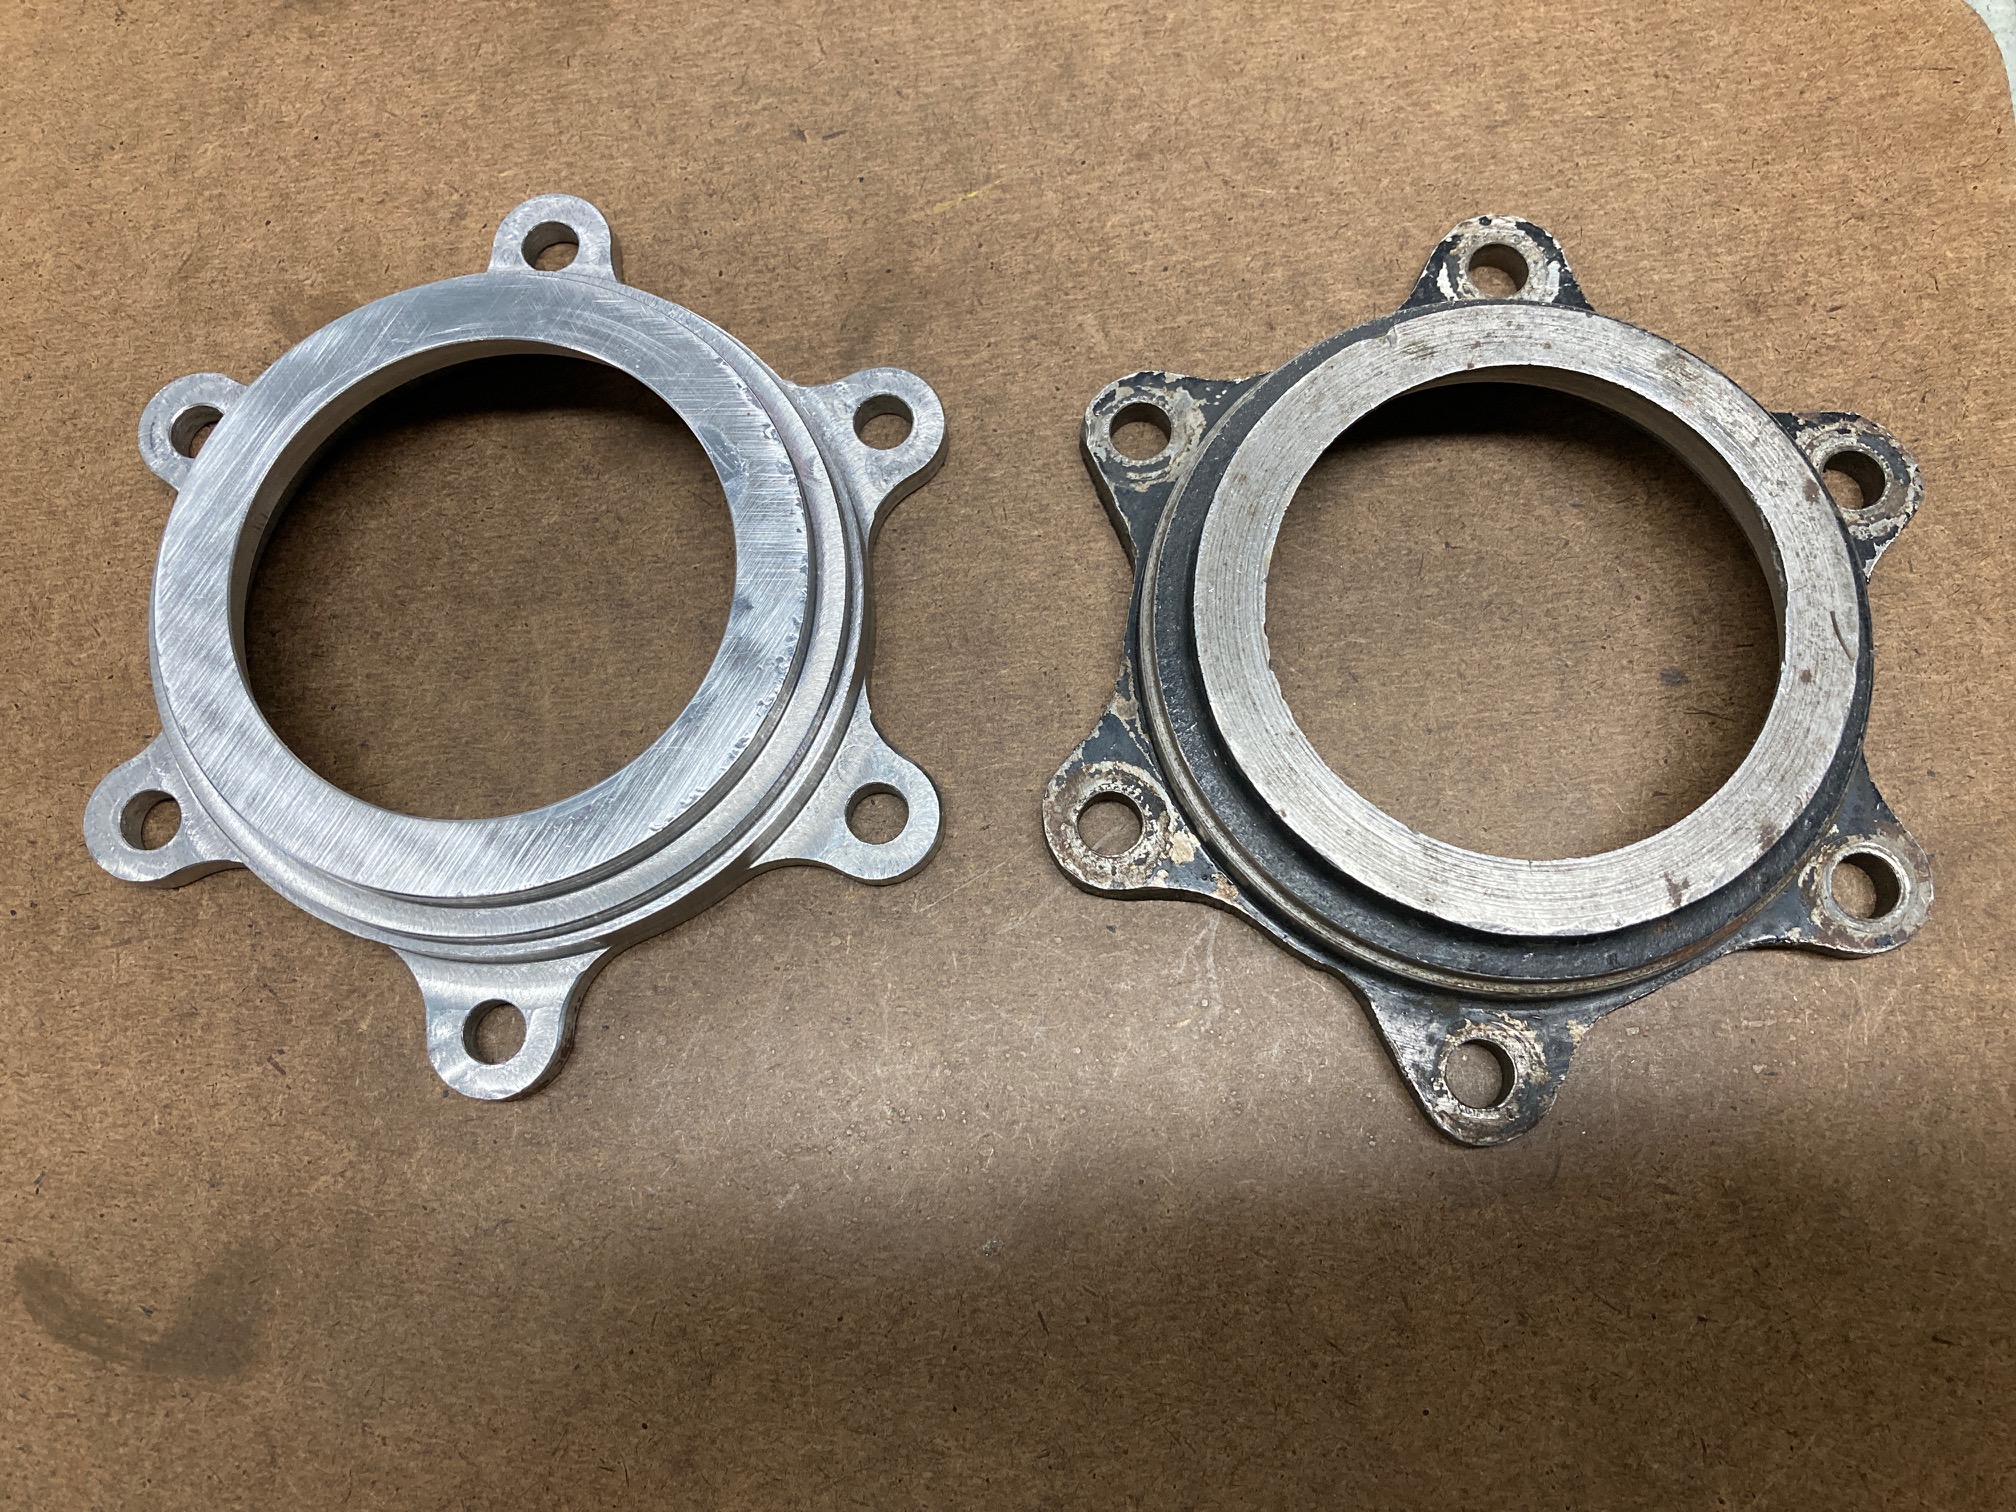
The photos below show the completed bearing retainer compared to an original Cobra part manufactured in 1964.
The bearing even fit perfectly into the new part, just like the original; with a light press fit.
Result: Test successful.
This result reinforced in my mind the viability of making your own Cobra parts and further demonstrated the capability of the technology availalbe today even for a home shop.
Again for the detail oriented reader, there is a minor discrepancy between the new and old part. The radius around the bolt mounting holes of the new part is slightly different than the original. This was due to a minor drafting error I made when creating the 3D model in Fusion 360. Because the CAD and CAM software of Fusion 360 is so well integrated, the drafting correction which was made in the CAD side was automatically updated in the CAM side. The bottom line; the error was easily fixed. This "error" further demonstrated the power of the Fusion 360 package.

I plan on adding more to this CNC learning journey as it becomes availalbe.