Welcome to Our Garage
Daytona Coupe, 289 and 427 Cobras
-2-
289 Cobra Replica -
Fabrication Details
Since my Daytona project started with the construction of a 289 roadster, it seemed appropriated to show a few photos of the 289 in various stages of construction.
The reasoning for building a 289 roadster first was twofold. If I could not build the relatively simple roadster body, the much more complicated Daytona Coupe would be hopeless. Also, since the 289 roadster chassis and running gear was the basis of the Daytona, understanding, documenting and fabricating these parts (even to the extent of fabricating extras of many of the roadster pieces) would put me a few steps closer to the Daytona goal.
The actual roadster construction started in about 1976. This was before virtually any of the replica kits that are relatively common now days were available. Figuring out chassis specifications was the first order of business. Fortunately, living in California, there were a number of original Cobra roadsters available to inspect; some in good condition and some in need of a little restoration. The following two photos show a pile of Cobra chassis pieces that needed help, but were none the less very helpful simply because of the accessibility of virtually all of the tubes.
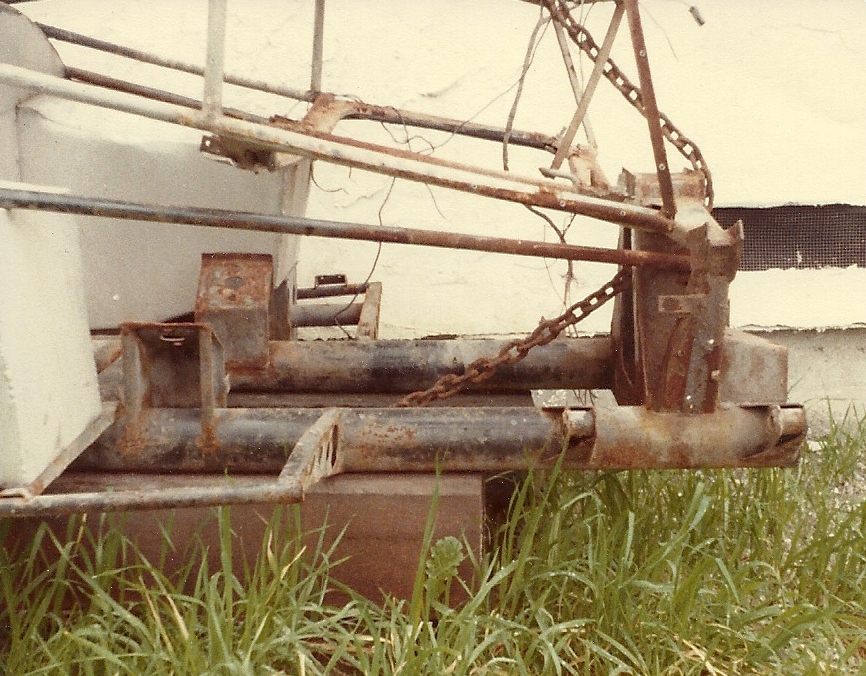
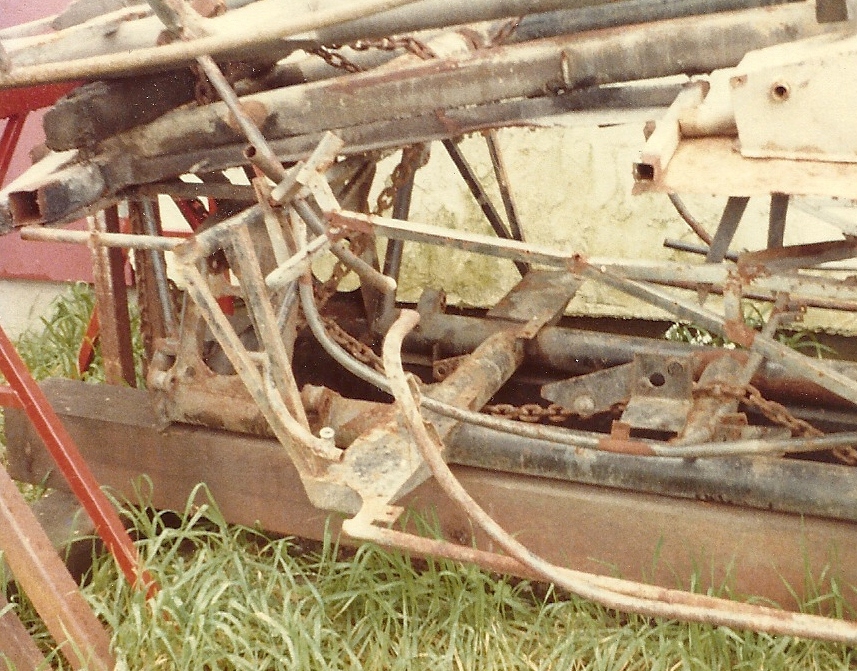
Research, drawing, research, drawing was my MO for quite a while. At the time, manual drafting was the norm and affordable CAD software was a thing of the future.
With my chassis drawings completed, it was time to start fabrication of the basis chassis ladder. The photos below show the ladder and the addition of the suspension and spring tower mounts. If you look closely, at the middle photo, the more knowledgeable Cobra folks will note that the steering rack is mounted on the wrong side of the front spring tower (it should be on the front of the tower, not the rear). A little time with the grinder and some new material, the mount was installed in the correct location.


After the "ladder" was completed, it was time to turn our attention to the superstructure tubes. This was one of the more complicated tasks for me. Fortunately, I had two indispensable aids. First was CSX3193. Above the main chassis ladder, the 289 and 427 Cobra roadsters share many tubes, brackets and design concepts. For the most part, many of the 289 and 427 components indistinguishable from one another. Hood, doors and trunk (excuse me - "bonnet" and "boot") are identical between the two styles. Secondly, I had recently obtained a very accurate fiberglass 289 Cobra roadster body. The body's manufacturer is unknown, but I suspect that it was laid up sometime in the early 1970's. I am confident in it's authenticity because it was mounted on an original 289 cobra chassis before I purchased it. Again having access to a number of original 289 Cobras aided in resolving any details that were different between the 289 and 427.
Notes and drawings in hand and with no experience in chassis fabrication at all, it was off to the garage. Bending the 3/4" x .063" wall steel tubing was the first order of business. The first photo shows one of the forms that I used to bend some of the superstructure tubes.

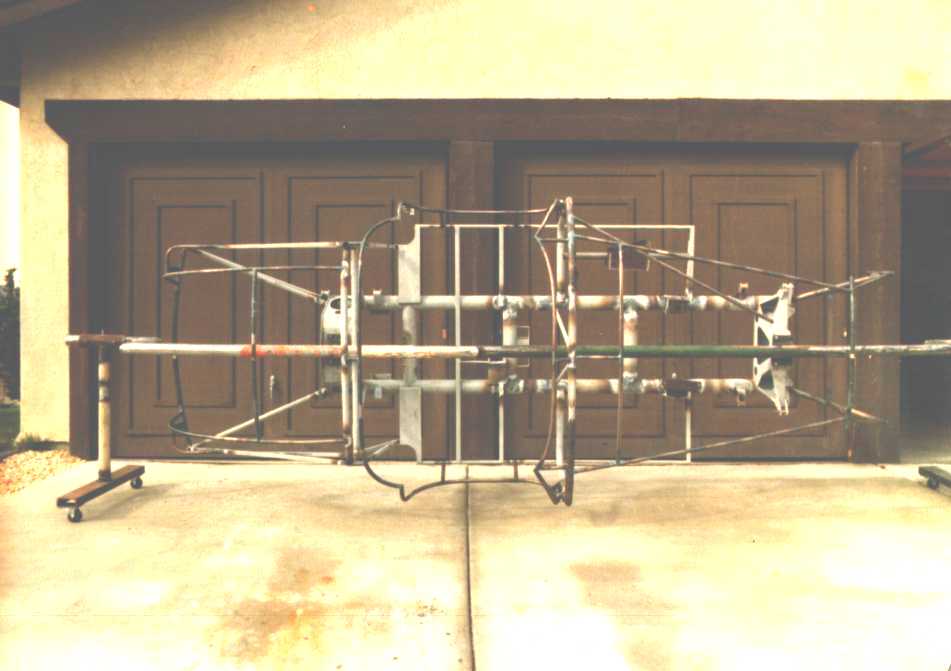
The subsequent photos show my car with most of the superstructure in place (all of the light gray tubes). The bare (read that "rust colored" tubes) is the jigging and chassis table that I built to expedite locating the tubes for tack welding. All of the jigging was bolted to the table to allow removal for easier welding access.

In addition to the table, a "rotisserie" was constructed to allow the entire chassis to be rotated about its longitudinal axis for easier welding and painting of the numerous tubes.
With the chassis and superstructure completed, I turned my attention to the body. As previously noted, I was fortunate to have found a very exacting fiberglass body. Although it had no hood, the main body, trunk and doors had been removed from an original Cobra chassis with minimal damage to the fiberglass. We have no idea why an original Cobra chassis supported a fiberglass body, but can only speculate that it had been heavily damaged and repairing (or replacing) the body with an original aluminum skin was prohibitively expensive for the previous owner.
Test fitting of the body to the completed chassis was the next task. It was time to tell whether our chassis and body would be happy together. The following photo shows the car starting the process of mounting to the superstructure tubing.

Fast forward a few months and the completed car was ready for an initial test drive. I even utilized the soft top from CSX3193 to to ensure correct placement of windshield and other components.

One unique feature of my 289 replica is the use of all original cobra parts. Other than the chassis and the body, all of the components used are original issue NOS (New Old Stock) Cobra pieces. The following photo was taken shortly after the arrival of over a dozen boxes I purchased from another Cobra enthusiast. This was a true lucky find, since the vast majority of Cobra aftermarket suppliers had not yet appeared ont he scene. Visible in the photo are; headers, complete rear end, springs, A-arms, seat belts, headlights, emergency brake cables, master cylinders, etc.

One of the items that was not included in my good fortune original parts find, was a set of seats. A few years prior, a good friend had donated an original 289 seat to my project. The seat was well worn, had no seat tracks, and there was only one. This original was disassembled and two new reproductions were made. This photo shows the basic construction of the 289 roadster seats. Unlike the later 427 roadster seats which used a rubber "bladder" for a bottom panel, the 289 seats were completely aluminum and supported by a 3/4 inch diameter round steel tube frame.

Another obvious need for the car was a fuel tank. Again another Cobra owner came through and furnished an original 289 Cobra tank. The tank was in reasonable shape and could have been used (with a little repair). However, my concept of the car was begining to evolve into the goal of fabricating as much of the car as possible while maintaining its authentic details where possible. Therefore I decided to build a new authentic specification tank, rather than use the original. How many of you have seen the inside of a 289 cobra roadster tank? The photos below show the new tank that I fabricated.


One final consideration of my 289 Cobra replica construction is the wiring system. Gauges, switches, and other components were available (albeit with some definite searching required - remember this was also before the Internet became the parts resource that it has become today.) The wiring harness from a 19xx Ford Fairlane served as the starting point and was modified to resemble a Cobra harness with Stewart Warner gauges and an alternator based charging system. The photo below shows the underside of the dashboard while mocking up the harness. (Note the judicious use of duct tape to hold the harness together.)
